
Hey All!!
We are starting with few demo series posts where you will been having great leaning and hands on experience of Modern Web App Development including Cloud, Data Science and Cyber Security domains.
This first article will drive you through how to launch Linux Flavor on Web Browser to use for various application and testing OS features perspective.
Here Contributors have implemented this PaaS – using Docker and Containers .
Follow Below Steps as shown below:
Install Docker on Ubuntu 20.04
There are two options when for installing Docker on your Ubuntu system:
- Installing using the official Docker repository
- Installing using the default repositories
When you download a package from the default Ubuntu repository, it may not be the latest version. If installing the latest (or a specific) version of Docker is important, use the official repository. We will going to install by first method.
- Update the
aptpackage index and install packages to allowaptto use a repository over HTTPS:
sudo apt-get update
- This Docker install commands simply configures your Ubuntu instance with the required prerequisites:
- CURL – the utility which is used to download the Docker GPG key
- GnuPG – a free implementation of OpenPGP to work with the Docker GPG key
- The lsb-release command to identify the Linux distribution currently being used
- Certificate Authority support
sudo apt-get install \\
  apt-transport-https \\
  ca-certificates \\
  curl \\
  gnupg \\
  lsb-release
- Next, add the GPG key to ensure the authenticity of the software package:
curl -fsSL <https://download.docker.com/linux/ubuntu/gpg> | sudo gpg --dearmor -o /usr/share/keyrings/docker-archive-keyring.gpg
- Use the following command to set up the repository:
echo \\
  "deb [arch=$(dpkg --print-architecture) signed-by=/usr/share/keyrings/docker-archive-keyring.gpg] <https://download.docker.com/linux/ubuntu> \\
  $(lsb_release -cs) stable" | sudo tee /etc/apt/sources.list.d/docker.list > /dev/null
- Update the
aptpackage index
sudo apt-get update
- install the latest version of Docker Engine, containerd, and Docker Compose, or go to the next step to install a specific version:
sudo apt-get install docker-ce docker-ce-cli containerd.io
Check Version
docker -v
Install Docker Compose
1.To download and install the Compose CLI plugin, run:
sudo curl -L "<https://github.com/docker/compose/releases/download/1.29.1/docker-compose-$>(uname -s)-$(uname -m)" -o /usr/local/bin/docker-compose
- Apply executable permissions to the binary:
sudo chmod +x /usr/local/bin/docker-compose
Check Version
Test the installation.
docker-compose -v
Use Docker without sudo
After this command no need run docker command with sudo.
sudo usermod -aG docker $USER
Webtop
Alpine, Ubuntu, Fedora, and Arch based containers containing full desktop environments in officially supported flavors accessible via any modern web browser.
Configuration steps
- Make a directory
mkdir webtop
- Move inside it
cd webtop
- Make another directory name config in which all configuration files will store at the time of execution.
mkdir config
- Make yml file named as docker-compose
nano docker-compose.yml
- Copy the configuration and paste in that file.
version: "2.1"
    services:
      webtop:
        image: ghcr.io/linuxserver/webtop:ubuntu-mate #choose your flavor
        container_name: webtop
        #privileged: true #optional but not needed unless you are running kde or i3 or other tools
        environment:
          - PUID=1000 # based on id
          - PGID=1000 # based on group
          - TZ=America/Chicago # your timezone
        volumes:
          - /home/user/webtop/config:/config #home directory
          #- /var/run/docker.sock:/var/run/docker.sock #optional only if you need access to docker winthin this container
        ports:
          - 3000:3000
        shm_size: "2gb" #optional but set to 1GB or higher to prevent browser crashes
        restart: unless-stopped
        # env_file:  #only necessary if you want to change the password, see .env file
        #   - .env
Create and Start Webtop container
Simply run docker compose up -d from within the same folder and the heimdall image will be automatically pulled, and a container will be created and started. up means bring the services up, and -d means do it in the background.
docker-compose up -d
Realtime Log Monitering
docker logs -f webtop
Check Version Number of Image
docker inspect -f '{{ index .Config.Labels "build_version" }}' lscr.io/linuxserver/webtop:latest
Check Version Number of container
docker inspect -f '{{ index .Config.Labels "build_version" }}' webtop
Updating Images
docker-compose pull
Remove Old Images
docker image prune
Stop Container
docker stop webtop
Delete Container
docker rm webtop
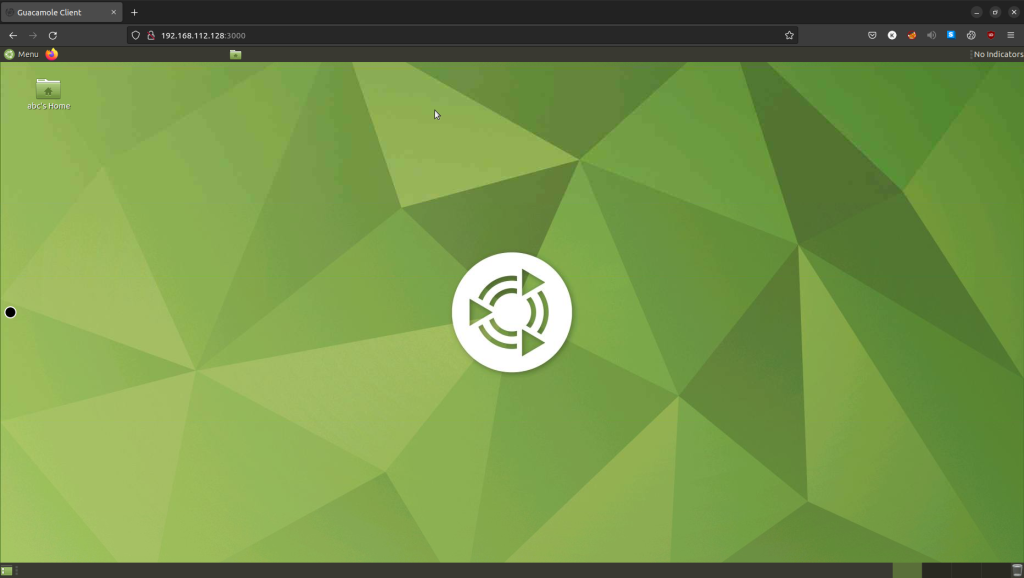
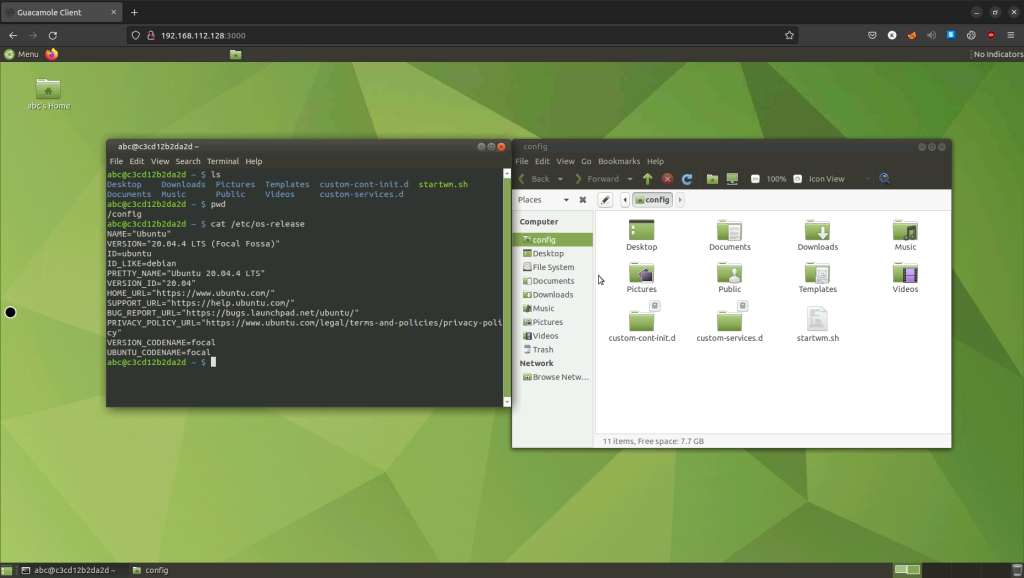
Screenshots:
Prepared by:-
Kushlendra Singh H Kushvansh [Sem 5]
B Tech Computer Science Engineering (Cyber Security)
ICT Ganpat University
LinkedIn:- https://www.linkedin.com/in/kushlendra-singh-b26b87208/
Guided By:-
Prof. Rahul Shrimali, Assistant Professor, CSE, ICT, Ganpat University
For more details Visit Us: https://ict.guni.ac.in/


